Book a Free Strategy Call
Skip the read: talk to Walid in 30 min.
Free strategy call. We map your AI engineering team, you keep the notes.
The 10 Claude Code commands worth using every day: /compact to shed context without losing your place, /init to wire up a repo in one shot, /clear to start a clean context window, /cost to track token spend in real time, and /doctor to diagnose configuration issues. Full list with exact use cases below.
Claude Code ships with dozens of built-in slash commands, but most developers only use two or three. That means leaving serious productivity on the table. Whether you are debugging a broken CI pipeline, managing context windows during long sessions, or trying to get Claude to review your code before you push, the right command at the right time can save you minutes on every task.
This guide covers the 10 Claude Code commands that deliver the most value in 2026. We go beyond the basics to show you when each command matters, how to use it effectively, and the pro tips that separate casual users from power users. We also cover how to build your own custom slash commands using the skills system, so you can tailor Claude Code to your exact workflow.
Best Claude Code commands: a brief overview
If you are setting up a new project:
- Run
/initfirst to generate a CLAUDE.md file that gives Claude deep context about your codebase - Follow up with
/doctorto make sure your environment is configured correctly
If you are managing long coding sessions:
- Use
/compactwhen responses start slowing down or context gets noisy - Use
/clearwhen you want a completely fresh start without leftover context - Check
/costperiodically to track token usage across sessions
If you are shipping code and collaborating:
- Run
/reviewbefore every pull request to catch issues early - Use
/pr-commentsto address reviewer feedback without manually parsing each comment
If you want to customize your workflow:
- Set up
/memoryto persist project-specific instructions across sessions - Toggle
/vimif you prefer modal editing keybindings - Build custom slash commands with the skills system for repetitive tasks
| Command | What it does | When to use | Category |
|---|---|---|---|
/init | Generates a CLAUDE.md project file | New project setup | Setup |
/compact | Compresses conversation context | Long sessions, slow responses | Context management |
/clear | Clears entire conversation history | Fresh start needed | Context management |
/cost | Shows token usage and costs | Budget tracking, optimization | Monitoring |
/doctor | Diagnoses setup and config issues | Troubleshooting, initial setup | Debugging |
/memory | Views and manages memory files | Persisting instructions across sessions | Configuration |
/review | Reviews code changes | Pre-PR quality checks | Code quality |
/pr-comments | Addresses PR review comments | After receiving PR feedback | Collaboration |
/vim | Toggles vim keybinding mode | Vim users who want modal editing | Editor |
| Custom skills | User-defined slash commands | Repetitive project-specific tasks | Extensibility |

1. /init: generate a CLAUDE.md for your project
The /init command scans your project and generates a CLAUDE.md file at the root of your repository. This file acts as persistent context that Claude reads at the start of every conversation. It includes your tech stack, project structure, key file paths, coding conventions, and build commands.
Without a CLAUDE.md, Claude starts every session blind. It has to infer your framework, guess your conventions, and figure out your project layout through trial and error. With /init, Claude understands your codebase from the first message.
How to use it
Open Claude Code in your project root and type:
/init
Claude will analyze your repository structure, detect frameworks, read your package.json or equivalent config files, and generate a comprehensive CLAUDE.md. You can review and edit the file afterward to add anything Claude missed.
When to use it
- The first time you use Claude Code on any project
- After major architectural changes (new frameworks, restructured directories)
- When onboarding team members who will use Claude Code on the same repo
Pro tip: Do not treat the generated CLAUDE.md as read-only. Add your team's specific conventions, link to internal docs, and include "DO NOT" rules for things Claude should avoid. The more specific you make it, the better Claude performs. Projects with a well-maintained CLAUDE.md see noticeably fewer hallucinations and off-target suggestions.
2. /compact: compress conversation context
The /compact command summarizes your current conversation into a condensed form, freeing up context window space while preserving the important details. When Claude is working through a long, multi-step task, the conversation history can grow large enough to slow down responses or push out early context.
Running /compact tells Claude to create a compressed summary of everything discussed so far, then continue the conversation with that summary as the base context. You keep the knowledge without the bloat.
How to use it
/compact
You can also provide a focus topic to guide what gets preserved:
/compact focus on the database migration changes
This tells Claude to prioritize retaining context about database migrations while being more aggressive about compressing other parts of the conversation.
When to use it
- After 15 to 20 back-and-forth messages in a session
- When Claude starts repeating itself or losing track of earlier decisions
- Before starting a new sub-task within the same session
- When you notice response times increasing
Pro tip: Run /compact proactively rather than waiting for problems. A good habit is to compact after completing each distinct sub-task. If you have been refactoring a module and are about to move on to writing tests, compact first. You will get sharper responses on the new task because Claude is working with a cleaner context.
3. /clear: start a fresh conversation
The /clear command wipes the entire conversation history and gives you a blank slate. Unlike /compact, which preserves a summary, /clear removes everything. Claude will still have access to your CLAUDE.md and memory files, but the conversational context resets completely.
How to use it
/clear
That is it. No options, no confirmation prompt. The conversation is gone.
When to use it
- When switching to a completely unrelated task
- After a conversation has gone off track and compacting will not fix it
- When Claude has accumulated incorrect assumptions you cannot easily correct
- At the start of a focused coding session where you want zero noise
Pro tip: Pair /clear with a strong opening message. After clearing, your first message sets the entire tone and direction for the session. Instead of a vague "help me with the auth system," start with something like "I need to add OAuth2 PKCE flow to the login page. The auth config lives in lib/auth.ts and the login component is at app/(auth)/signin/page.tsx." The more context you front-load after a clear, the better Claude performs for the rest of the session.
4. /cost: track token usage and costs
The /cost command displays a breakdown of your token consumption and associated costs for the current session. It shows input tokens, output tokens, cache reads, and the total cost in dollars.
This matters more than most developers realize. A single long Claude Code session can consume millions of tokens. Without visibility into usage, you can blow through your daily budget without understanding why.
How to use it
/cost
The output shows something like:
Session cost: $2.47
  Input tokens:   1,245,000 ($3.75 per 1M)
  Output tokens:    312,000 ($15.00 per 1M)
  Cache reads:      890,000 (discounted)
  Duration:         47 minutes
When to use it
- At the end of each coding session to track spending
- Before and after expensive operations (large file reads, multi-file refactors)
- When setting up team budgets for Claude Code usage
- To compare the cost efficiency of different approaches to the same task
Pro tip: Check /cost before and after running /compact. Compacting significantly reduces input token costs on subsequent messages because the compressed context is much smaller than the full conversation history. You can measure exactly how much you save, which helps justify the habit to budget-conscious teams.
5. /doctor: diagnose your Claude Code setup
The /doctor command runs a series of diagnostic checks on your Claude Code installation and project configuration. It verifies your authentication, checks for common misconfigurations, validates your MCP server connections, and flags any issues that might cause problems during your session.
Think of it as a health check for your Claude Code environment. It catches problems before they interrupt your flow.
How to use it
/doctor
Claude runs through its checklist and reports back with a status for each check. Green means good, yellow means potential issue, red means something is broken and needs attention.
When to use it
- After installing or updating Claude Code
- When MCP servers are not connecting or tools are missing
- After changing authentication credentials or API keys
- When Claude Code behavior seems off and you cannot pinpoint why
- As a first step when onboarding a new team member
Pro tip: Run /doctor after adding any new MCP server to your configuration. MCP connection issues are the single most common source of "Claude cannot do X" complaints, and /doctor catches misconfigured server paths, missing environment variables, and permission problems before they waste your time. For teams running Claude Code as part of a larger automation stack, an automation maintenance and support plan keeps your tools, MCP servers, and pipelines monitored and healthy without pulling developers off feature work.
6. /memory: manage persistent instructions
The /memory command lets you view and edit your memory files, which persist across conversations. Memory files are markdown documents stored in ~/.claude/ (global) or .claude/ (project-level) that Claude reads at the start of every session.
While CLAUDE.md is typically generated by /init and checked into version control, memory files let you store personal preferences, project-specific reminders, and instructions that should follow you across sessions without cluttering the repo.
How to use it
/memory
This opens an interactive view of your memory files. You can read existing entries, add new instructions, or edit current ones.
You can also add to memory directly during a conversation. When you tell Claude something like "remember that we use pnpm, never npm," Claude can write that to your memory file so it persists.
When to use it
- To store personal coding preferences (formatting rules, naming conventions)
- To persist project-specific instructions that do not belong in
CLAUDE.md - To maintain a running list of "lessons learned" for a project
- When you find yourself repeating the same instruction across multiple sessions
Pro tip: Use project-level memory for team-shared context and global memory for personal preferences. For example, your global memory might say "always explain reasoning before showing code," while your project memory might say "this project uses Prisma, never write raw SQL queries." This layered approach keeps instructions organized and prevents conflicts.

7. /review: review code changes before you push
The /review command tells Claude to examine your current code changes (staged, unstaged, or both) and provide a thorough code review. It looks at diffs, identifies potential bugs, suggests improvements, checks for security issues, and flags anything that does not match your project's conventions.
This is one of the highest-value commands in Claude Code. Running /review before every pull request catches issues that would otherwise require back-and-forth with human reviewers. It reduces review cycles and improves the quality of what you push.
How to use it
/review
Claude reads your git diff, analyzes every changed file, and provides feedback organized by severity: critical issues first, then warnings, then suggestions. It references specific line numbers and explains why each issue matters.
When to use it
- Before creating a pull request
- After finishing a feature branch and before merging
- When you want a second opinion on a tricky implementation
- As a learning tool to understand what better code looks like
Pro tip: Combine /review with a follow-up "fix the critical issues" message. Claude will read its own review, identify the highest-priority problems, and make the changes for you. This two-step workflow (review, then fix) is faster than asking Claude to write perfect code on the first pass, because the review step forces it to evaluate quality before acting.
8. /pr-comments: address PR review feedback
The /pr-comments command pulls in review comments from your current pull request and helps you address them one by one. Instead of switching between your browser and terminal, copying reviewer feedback, and manually figuring out what each comment refers to, this command brings everything into Claude's context.
Claude reads each comment, understands the context of the code being discussed, and either makes the requested change or explains why an alternative approach might be better.
How to use it
/pr-comments
Claude fetches the comments from your open PR, groups them by file, and works through them. For straightforward requests (rename this variable, add a null check), it makes the change immediately. For more nuanced feedback, it explains the trade-offs and asks for your input.
When to use it
- After receiving code review feedback on a PR
- When you have multiple review comments to address at once
- To speed up the review-revise cycle on collaborative projects
Pro tip: Use /pr-comments as soon as you get the review notification. The faster you address feedback, the shorter the review cycle. Claude can often resolve 70 to 80 percent of standard review comments (naming, error handling, missing tests, documentation) without any additional input from you. That leaves you free to focus on the comments that require actual design decisions.
9. /vim: toggle vim keybinding mode
The /vim command toggles vim-style keybinding mode in the Claude Code terminal interface. When enabled, you get modal editing with normal mode, insert mode, and the movement commands that vim users rely on.
This is a small command with outsized impact for developers who think in vim. Instead of fighting the default input mode, you get the editing experience your muscle memory expects.
How to use it
/vim
Run it once to enable vim mode. Run it again to disable it. The setting persists across sessions.
When to use it
- If you are a vim or neovim user and want consistent keybindings
- When editing long prompts that benefit from vim's movement and editing commands
- If you find yourself reaching for
Escandhjklout of habit
Pro tip: Vim mode in Claude Code supports the most common vim motions: h, j, k, l for movement, i and a for insert mode, dd for deleting lines, yy for yanking, and p for pasting. It does not support the full vim command set (no macros, no marks, no ex commands), but it covers the core editing workflow. If you use vim bindings in your IDE, turning this on removes a context-switching penalty every time you move to the Claude Code terminal.
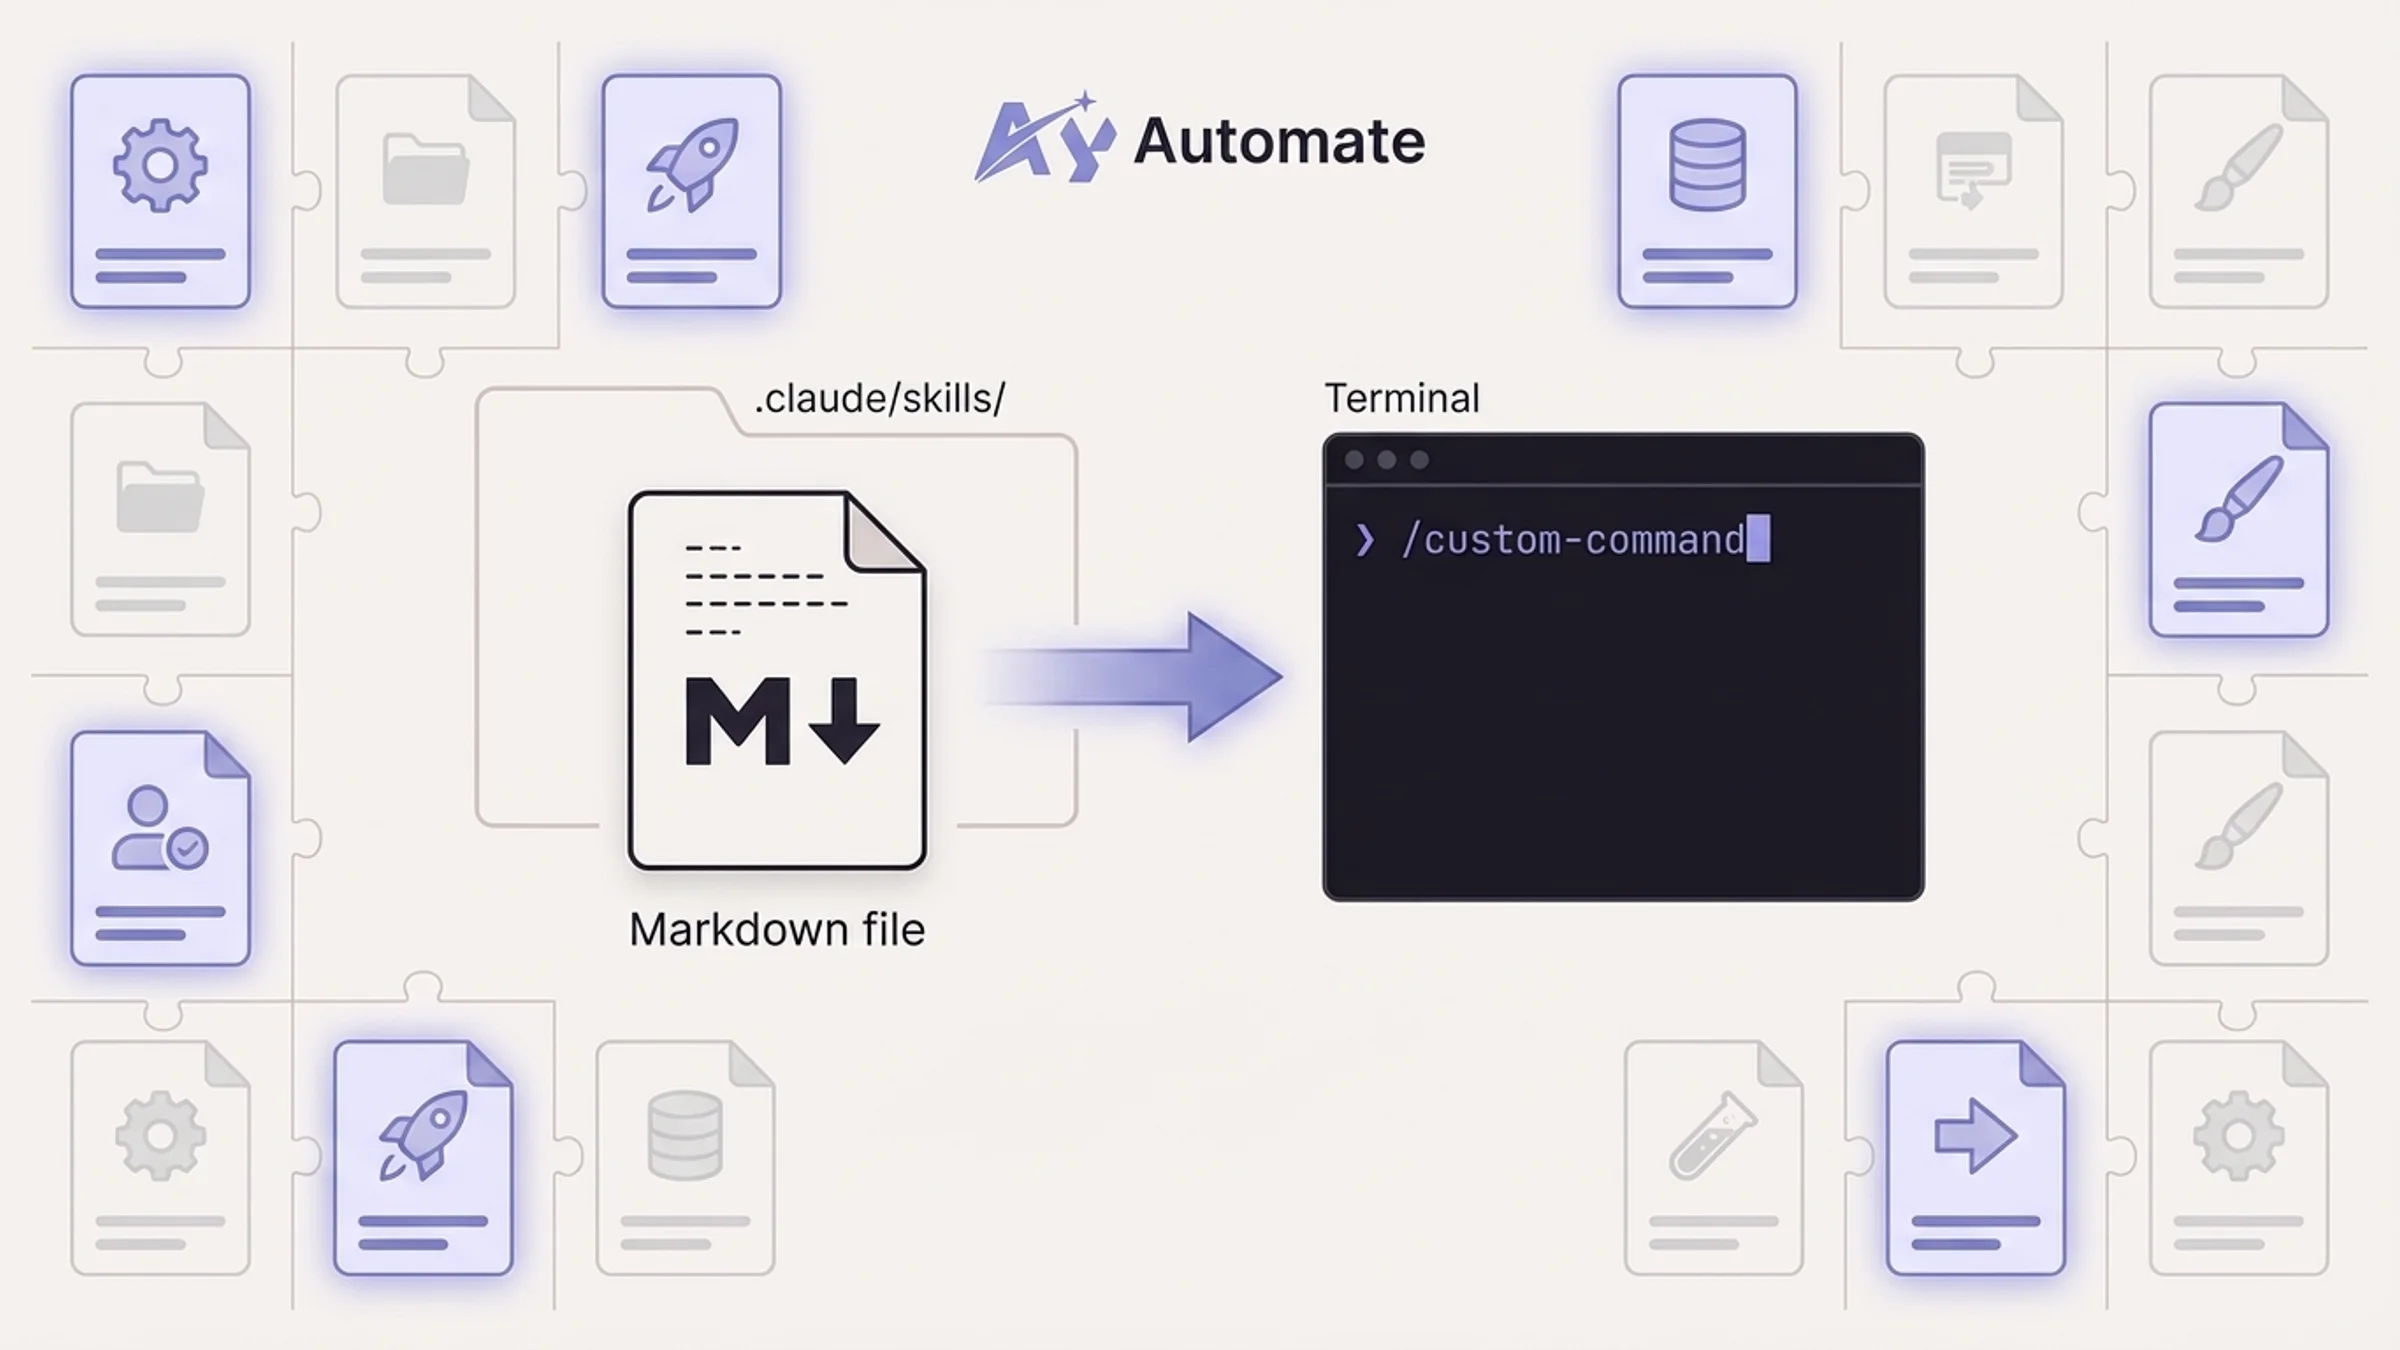
10. Custom slash commands via skills
Beyond built-in commands, Claude Code lets you create your own slash commands using the skills system. A skill is a markdown file that defines a custom command, including when it should trigger, what instructions Claude should follow, and what tools it should use.
Custom slash commands are where Claude Code goes from a general-purpose AI assistant to a tool shaped around your specific workflow. If you find yourself typing the same multi-step instructions repeatedly, that is a custom command waiting to be built.
How skills work
Skills live in your .claude/skills/ directory (project-level) or ~/.claude/skills/ (global). Each skill is a markdown file with frontmatter that defines the command name, description, and trigger conditions.
Here is a minimal example of a custom slash command:
--- name: deploy-check description: Run pre-deployment checks on the current branch ---When this skill is invoked, perform the following steps:
- Run
pnpm buildand report any errors- Run
pnpm lintand list all warnings- Check that all environment variables referenced in code exist in
.env.example- Verify no
console.logstatements remain inapp/orlib/directoriesSummarize results and flag any blockers
Save this as .claude/skills/deploy-check.md and it becomes available as /deploy-check in your Claude Code sessions.
A more advanced example
--- name: db-migrate description: Create and validate a Prisma migration ---When invoked:
- Read the current
prisma/schema.prismato understand the existing schema- Ask what changes the user wants to make
- Edit the schema file with the requested changes
- Run
pnpm prisma migrate dev --name <descriptive-name>to generate the migration- Review the generated SQL in
prisma/migrations/for correctness- Run
pnpm prisma generateto update the clientIf there are any model changes, check for corresponding API route updates needed
When to create custom commands
- When you repeat the same multi-step workflow more than twice
- For team-specific processes (deployment checklists, code review standards, release prep)
- To encode institutional knowledge that new team members need to follow
- For complex operations that require a specific sequence of tool calls
Pro tip: Share your .claude/skills/ directory through version control. When you check skills into your repo, every team member gets the same custom commands. This is particularly powerful for onboarding. New developers get slash commands that encode your team's exact processes, from how to create a migration to how to structure a new API endpoint. If your team also relies on n8n or similar platforms, pairing custom Claude Code skills with a custom n8n automation setup lets you trigger multi-step workflows that span both your terminal and external services. Check out the Ay-Skills open source repo for examples of production-grade skills you can use as templates.
How to create custom Claude Code commands
Building custom slash commands follows a straightforward process. Here is a step-by-step walkthrough.
Step 1: Create the skills directory
mkdir -p .claude/skills
Step 2: Create your skill file
Each skill is a single markdown file. The filename becomes part of how you reference it:
touch .claude/skills/my-command.md
Step 3: Add frontmatter and instructions
The frontmatter defines metadata. The body contains the instructions Claude follows when the command is invoked:
--- name: component-gen description: Generate a new React component following project conventions ---When this skill is invoked with a component name:
- Create the component file in
components/following the project's naming convention- Use TypeScript with proper type exports
- Include
"use client"directive only if the component needs interactivity- Use
cn()fromlib/utils.tsfor className merging- Add JSDoc comments for all props
Create a basic test file alongside the component
Step 4: Test your command
Start a new Claude Code session in your project directory. Your custom command appears in the command list and can be triggered with /component-gen.
Step 5: Iterate and share
Refine the instructions based on results. Once the command works reliably, commit it to your repo so the whole team benefits:
git add .claude/skills/component-gen.md
git commit -m "Add component generation skill for Claude Code"
For teams that want a head start, our custom training service includes building tailored Claude Code skills for your specific tech stack and workflows.
Get more from Claude Code
The commands in this guide cover the core workflow. But the real leverage comes from combining them: /init to set the foundation, /memory to build up context over time, /compact to keep sessions fast, /review to catch issues before they reach PR, and custom skills to automate the repetitive work unique to your team.
If you are building AI-powered products or want to integrate Claude Code into your development pipeline at scale, our AI agent development team can help you design the right setup. For teams that want hands-on help configuring Claude Code for their codebase, reach out to us and we will put together a plan.
Frequently asked questions
What are Claude Code slash commands?
Slash commands are built-in shortcuts you type directly into the Claude Code terminal. They start with a forward slash (like /init or /review) and trigger specific functionality without needing to write a full natural language prompt. They are faster and more reliable than asking Claude to perform the same action through a regular message.
How do I see all available Claude Code commands?
Type / in the Claude Code terminal and you will see an autocomplete list of all available commands, including both built-in commands and any custom skills you have created. You can also type /help for a summary of the most important commands and what they do.
Is /compact the same as /clear?
No. /compact compresses your conversation into a summary while preserving the key context and decisions. /clear erases everything and starts from scratch. Use /compact when you want to keep working on the same task with a lighter context. Use /clear when you are switching to something completely unrelated.
How much does a Claude Code session cost?
Costs vary based on the model and how many tokens you use. The /cost command shows your exact usage for the current session. A typical 30-minute coding session might use 500K to 2M tokens depending on how many files Claude reads and how much code it generates. Using /compact regularly helps keep costs down by reducing redundant context in each message.
Can I share custom slash commands with my team?
Yes. Custom skills are markdown files stored in .claude/skills/ within your project directory. Commit this directory to version control and every team member who clones the repo gets the same custom commands. This is the recommended way to standardize Claude Code workflows across a team.
Do slash commands work with all Claude models?
Yes. Slash commands are part of the Claude Code client, not the underlying model. They work regardless of which Claude model you are using. The commands themselves execute on the client side and then send the appropriate prompts or actions to whichever model is active.
What is the difference between CLAUDE.md and memory files?
CLAUDE.md is a project-level file typically generated by /init and checked into version control. It gives Claude context about your codebase structure, tech stack, and conventions. Memory files managed through /memory are personal or project-specific notes that persist across sessions. Think of CLAUDE.md as the team playbook and memory files as your personal notebook.
How do I create an MCP-powered custom command?
Custom skills can reference MCP tools in their instructions. If you have an MCP server configured (like a database connector or API integration), your skill's instructions can tell Claude to use those tools as part of the command workflow. For example, a skill could instruct Claude to query a Postgres database via an MCP server, analyze the results, and generate a report. The skill file itself is still just markdown with instructions. The MCP connection is configured separately in your Claude Code settings.
Continue Reading
Claude Mythos: The AI Model Anthropic Says Is Too Dangerous to Release (And What It Found)
Claude Mythos: The AI Model Anthropic Says Is Too Dangerous to Release (And What It Found)
Claude Opus 4.7: What Actually Changed and What It Means for Developers
Claude Opus 4.7: What Actually Changed and What It Means for Developers
10 Best Claude Code Hooks to Add in 2026
The 10 best Claude Code hooks to automate your workflow. Pre-commit linting, auto-testing, security scanning, and more with full code examples.
Book a Free Strategy Call
Building this in production?
Walid runs a 30-min call to map your AI engineering team. Free, no slides.
Free weekly brief
Steal our production automations
The exact n8n flows, Claude Code setups, and prompts we ship for clients, broken down step by step. No spam, unsubscribe anytime.

Taha builds and ships custom AI agents and workflow automations for AY Automate clients across SaaS, finance, and professional services.